_edited.jpg)

Hello! Do you enjoy Cooking?
This page is all about sharing my favorite recipes. Kind of a cooking Vlog! Here I will share recipes, blogs, and instructional videos on various cooking techniques and recipes. You will see me try, fail, and hopefully succeed some of the time.

Click Here for Video
Taco Pie with Mushrooms
Welcome back to our kitchen! Today, we're diving into the world of savory comfort food with a twist – Taco Pie featuring mushrooms and adobo seasoning! This recipe is a delightful fusion of flavors that will tantalize your taste buds and leave you craving more. Join us as we take you through each step of creating this mouthwatering dish. From sautéing the earthy mushrooms to seasoning them with aromatic adobo spices, every moment in the kitchen is a culinary adventure. What makes this recipe truly special is the harmonious blend of ingredients – the umami-rich mushrooms complemented by the bold flavors of adobo seasoning, all nestled within a golden, flaky crust. Whether you're cooking for a cozy family dinner or hosting a casual get-together with friends, this Taco Pie is sure to be a crowd-pleaser. As we cook, we'll share helpful tips and tricks to ensure your Taco Pie turns out perfectly every time. Plus, we'll discuss the versatility of adobo seasoning and how it can elevate a wide range of dishes beyond just tacos. So, grab your apron and join us in the kitchen as we embark on a flavor-packed journey. Don't forget to like, share, and subscribe for more delicious recipes and cooking inspiration. Let's cook up something amazing together!
.png)
Click Here for Video
Shepherds Pie... or is it?
Join me on Simmer and Smile with Jess as I navigate the hilarious and hearty world of Shepherd’s Pie! We'll sort out the difference between Shepherd’s Pie (with lamb) and Cottage Pie (with beef), then dive into a step-by-step (and laugh-filled) guide to making this comfort food classic. From peeling Yukon Gold potatoes to mastering the art of browning ground beef and creating a savory sauce, this recipe is packed with tips, tricks, and a few kitchen mishaps. Perfect for family dinners or impressing your friends, this dish is sure to become a favorite. Check out the full post for all the details, and don’t forget to like, subscribe, and share your own pie-making adventures!

Click Here for Video
Click Here for Video
Million Dollar Spaghetti & Sourdough Focaccia
Welcome to another delicious episode of Simmer and Smile with Jess! Today, I'm whipping up one of my family's all-time favorites: Million Dollar Spaghetti. This dish is perfect for any family gathering, and we’re preparing it for our late Valentine's Day celebration with my brother-in-law, his wife, my mother-in-law, my niece and nephew, and my husband. As a special bonus, I'm also baking some focaccia bread using my sourdough starter discard. I'll show you how to measure ingredients accurately with a food scale and mix the dough using a stand mixer. Join me in the kitchen as we create this hearty, cheesy spaghetti bake and a flavorful focaccia bread.
Happy cooking!
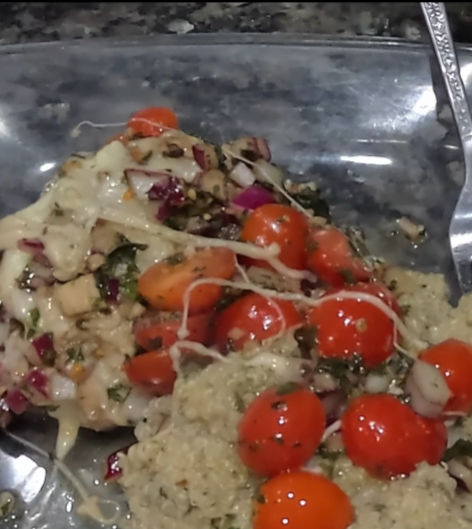
Healthy Dinner Eats Series: Recipe 1 - Delicious Bruschetta Chicken under 500 Calories
Welcome to the first installment of my Healthy Dinner Eats series! I’m kicking things off with a recipe that’s as flavorful as it is nutritious: Bruschetta Chicken. This dish is perfect for busy weeknights or whenever you’re in the mood for something fresh and satisfying. Even better, it’s under 500 calories, making it a guilt-free choice that doesn’t skimp on flavor.
Why You'll Love This Recipe:
-
Fresh and Flavorful: A delicious medley of juicy tomatoes, garlic, basil, and balsamic glaze takes center stage.
-
Healthy and Satisfying: Packed with lean protein and fresh veggies, it keeps you full and energized.
-
Simple to Make: Minimal ingredients and straightforward steps mean you can whip this up in no time.
Ingredients (Serves 2):
For the Chicken Marinade:
-
3 boneless, skinless chicken thighs
-
1 tbsp olive oil
-
1 tsp Italian seasoning
-
½ tsp garlic powder
-
Salt and pepper to taste
For the Bruschetta Topping:
1 cup Mozzarella cheese
-
1 cup diced Roma tomatoes (about 2-3 medium tomatoes)
-
1 Red onion
-
1 small garlic clove, minced (I love garlic, I do 3 or 4)
-
2 tbsp fresh basil leaves, chopped (Again, I add more cause basil is my fave)
-
2 tbsp balsamic vinegar
-
1 tsp olive oil
-
Salt and pepper to taste
Instructions:
Step 1: Prepare the Chicken
-
Preheat your oven to 375°F (190°C).
-
Marinate the chicken thighs for at least an hour (the longer, the better) with the olive oil and seasonings above.
-
Heat a skillet over medium-high heat and sear the chicken for 2-3 minutes per side until golden brown. Transfer the chicken to a baking dish.
-
Bake in the preheated oven for 20-25 minutes, or until the internal temperature reaches 165°F (75°C).
Step 2: Make the Bruschetta Topping
-
While the chicken bakes, combine the diced tomatoes, red onion, minced garlic, chopped basil, balsamic vinegar, olive oil, salt, and pepper in a bowl. Toss gently to mix.
-
Let the mixture sit for 10-15 minutes to allow the flavors to meld.
Step 3: Assemble and Serve
-
Once the chicken is done baking, remove it from the oven and spoon the bruschetta topping over each piece.
-
Sprinkle with mozzarella cheese.
-
Place back into the oven for about 10 minutes, long enough to warm the tomatoes and melt the cheese.
-
Serve immediately with zucchini noodles, quinoa, or a salad. And garnish with balsamic glaze.
-
Calories: ~475 (if you add a side dish it will increase all these numbers)
-
Protein: 38g
-
Carbohydrates: 10g
-
Fat: 26g
-
Fiber: 2g
Tips for Success:
-
Marinate for More Flavor: If you have time, marinate the chicken in olive oil, Italian seasoning, and a splash of balsamic vinegar for 30 minutes before cooking.
-
Choose Fresh Ingredients: Opt for ripe, juicy tomatoes and fragrant basil to make the bruschetta topping shine.
-
Customize: Add a pinch of red pepper flakes to the topping if you like a bit of heat.
This Bruschetta Chicken recipe is proof that healthy eating can be exciting and full of flavor. I’d love to hear how it turns out for you—share your creations and variations in the comments or on social media using #HealthyDinnerEats. Stay tuned for more tasty recipes in this series!
_edited.jpg)
_edited_edited.jpg)
Healthy Dinner Eats Series: White Bean, Lemon, and Kale Soup with Salmon
Welcome to another installment of my Healthy Dinner Eats series! I’m kicking things off with a recipe that’s as flavorful as it is nutritious: White Bean, Lemon, and Kale Soup with Salmon. This dish is perfect for cold Sundays whenever you’re in the mood for something fresh and warm. Even better, it’s low in calories, making it a guilt-free choice that doesn’t skimp on flavor.
Nourishing White Bean and Lemon Soup
Servings: 6 • Prep: 5 min • Cook: 35 min • Total: 40 min
Ingredients
-
2 (15-oz.) cans cannellini beans, rinsed & drained
-
4 cups lower-sodium vegetable broth, divided
-
2 Tbsp extra-virgin olive oil
-
1 yellow onion, finely chopped
-
2 large carrots, finely chopped
-
1 tsp each salt and cracked black pepper
-
4 garlic cloves, minced
-
1 (15-oz.) can chickpeas, rinsed & drained
-
1 Tbsp finely chopped fresh rosemary
-
1 small bunch kale, roughly chopped
-
Zest and juice of 1 lemon
-
1/3 cup grated Parmesan cheese, plus more for garnish
Equipment
-
Large stockpot or Dutch oven
-
Small blender (like a Nutribullet) or standard blender
Instructions
-
Blend Beans:
Combine 1 can of cannellini beans and 1 cup of broth in a blender; blend until completely smooth. You could use a submersion blender as well. Set aside. -
Sauté Aromatics:
Heat olive oil in a large stockpot or Dutch oven over medium heat. Add onion and carrots; cook until softened (about 7–8 minutes). Add garlic; cook another 1–2 minutes. Add the remaining can of cannellini beans, chickpeas, and rosemary; stir to combine and cook 1 minute. -
Simmer Soup:
Stir in the blended bean mixture, the remaining 3 cups of broth, chopped kale, salt, and pepper. Bring to a boil, then reduce the heat and simmer (uncovered) for 20–25 minutes, until the soup slightly thickens. -
Finish:
Stir in lemon zest and juice. Gradually sprinkle in the Parmesan, stirring continuously (adding slowly prevents clumping). -
Serve:
Ladle into bowls and garnish with extra Parmesan, cracked black pepper, and chopped rosemary if desired. Serve with crusty bread.
I chose to add some easy steamed salmon to this dish because it needed some protein. It is really easy take salmon fillets and place them on top of a large piece of aluminum foil. Sprinkle them salt and pepper, garlic powder, and lemon pepper seasoning. Zest and squeeze 1 lemon into 1/4 cup olive oil... maybe less depending on the size of the fillets. Mix that up and pour or brush over salmon and close up the aluminum foil all around to create a little pocket of salmon joy. Place in a 400-degree oven for approximately 10 to 20 minutes. It really depends on how thick your salmon fillet is. I cook by temperature; the salmon is done when the inside of the thickest part reads 145 on a meat thermometer.
Enjoy!
_edited.jpg)
Healthy Dinner Eats Series: Egg Roll in a Bowl
Cozy Comfort in a Bowl – My Favorite One-Pan Egg Roll + Fried Rice Dinner!
Hey friends!
Today’s kitchen adventure takes all the delectable flavors of your favorite egg roll — the savory pork, the crunchy cabbage, the garlicky goodness — and gives it a healthy, cozy twist right in one skillet!
I had so much fun filming this recipe — you guys know I’m all about meals that aren’t just delicious, but also simple, satisfying, and weeknight-friendly. This Egg Roll in a Bowl paired with fluffy fried rice hits all those marks.
Why I Love This Dish
-
One skillet = less cleanup.
-
Bold Asian-inspired flavors that don’t feel heavy.
-
Packed with veggies + protein (hello cabbage and lean meat!).
-
Feels like takeout… made at home with love!
This approach is inspired by the viral “egg roll in a bowl” trend, where you get all the crave-worthy flavors of an egg roll without the wrapper — plus the joy of mixing it into fried rice for an extra cozy, satisfying meal.
What’s in the Bowl?
Think: Savory ground meat, crispy veggies, zesty garlic and ginger, soy sauce magic, and all of it sizzling together with rice. It’s quick, bright, and perfect for meal prep or a relaxed dinner at home.
Whether you serve it over rice or eat it as is, each bite feels like a warm hug from your favorite comfort food.
Watch the Video
If you haven’t clicked play yet, you’ll see this tasty magic come together step-by-step!
👉 https://youtu.be/jh08bPJh4Yo
Egg Roll in a Bowl
Servings: 4-6
Total Time: ~28 minutes (10 min prep + 18 min cook)
Ingredients
-
1 lb ground turkey or ground chicken (you can also use lean ground beef or pork)
-
¼ cup yellow onion, chopped
-
3 cloves garlic, minced
-
2 teaspoons fresh ginger, grated or minced
-
1 (12–14 oz) package coleslaw mix (shredded cabbage & carrots)
-
¼ cup low-sodium soy sauce, tamari, or coconut aminos
-
2 teaspoons toasted sesame oil
-
1–2 teaspoons sriracha or sambal oelek (optional for heat)
-
2 green onions, sliced (for topping)
-
Optional garnishes: extra sriracha, sesame seeds, chopped cilantro
-
Optional serving: cooked cauliflower rice, rice, or quinoa
Instructions
-
Brown the Meat:
Heat a large skillet over medium-high heat. Add the ground meat and cook until no longer pink, about 5–6 minutes, breaking it into small pieces with a spatula. Season with salt and pepper while cooking. -
Add Veg & Sauce:
Add the chopped onion, garlic, ginger, coleslaw mix, soy sauce (or tamari/coconut aminos), sesame oil, and sriracha (if using) to the skillet. Stir everything together. -
Cook the Veggies:
Continue cooking, stirring occasionally, until the cabbage is tender, about 5 minutes. Taste and adjust seasoning or sauce as desired. -
Serve:
Portion into bowls and top with green onions, sesame seeds, and cilantro. Serve with additional sriracha, chili crisp, or over cauliflower rice if desired.
Tips & Variations
-
Swap in ground pork or beef if you prefer.
-
Add an egg for extra protein: make a well in the center of the skillet, scramble the egg, then mix it into the bowl.
-
Turn it into a meal prep dish — it stores well in an airtight container in the fridge for ~4–5 days.
_edited_edited.jpg)
Joyful Cooking!- Ribeye Steak and Veggie Kababs with Persian-style Tomato Rice
“Why My Dinner Tried to Run Away (and Other Tales From Making Kabobs)”
Hey friends! If you’ve ever wondered what happens when your food has more personality than you do, then buckle up — because my dinner and I had a moment.
So I recently decided to make these steak and veggie kababs with Persian rice (yes, fancy name, but trust me — it’s worth it) that looked like they might just jump off the skewers and run out the door.
First of all, these kababs were marinated like they were going to a five-star gala — garlic, Dijon mustard, maybe a tiny drop of my dignity for good measure — all cozying up together to become the juiciest, most charismatic kabobs in town. They basically begged to be grilled.
Meanwhile, the Persian rice was sitting there like a regal throne of carbs. Classic Persian rice isn’t just rice — oh no — it’s fluffy, it’s regal, it knows it’s the main attraction. And when you fluff it properly? It’s basically a cloud with goals.
Let’s talk about the veggies:
Carrot: sweet and optimistic.
Bell pepper: spicy with a dramatic flair.
Onion: the one that makes you cry (with joy and maybe a little chopping regret).
Now here’s the awkward part… the kababs started flirting with the grill. I caught them making eyes with the char marks like it was a reality TV dating show. I mean, I was just there like “Hey guys, behave… I’m just trying to eat you.”
Halfway through grilling, I gave the rice a pep talk. “Be patient,” I said. “You’re the calm to their sizzle.” And would you believe it? It worked — the rice stayed perfectly fluffy with an ego barely bruised.
When it came time to plate everything up… well… let’s just say my taste buds sent me a thank-you card. The steak? Tender. The veggies? Proud. The rice? Royal. And me? I was full and weirdly proud that dinner didn’t try to run out of the kitchen.
Final Thoughts:
If your food ever starts acting like it’s got more personality than your Monday morning coffee, just roll with it. Great food isn’t just delicious — it tells a story.
Would you make these kababs with rice next time? Drop a comment and let me know if your food has ever tried to steal the spotlight (or escape the grill) like mine did!
Here’s the link:
👉 https://youtu.be/5AxGwXrxfw4
Ribeye Steak Kabobs (Oven-Baked)
Serves: 4-6
Total Time: ~60 minutes (including marinating)
Ingredients
-
1.5–2 pounds ribeye steak, trimmed and cut into 1- to 1½-inch cubes
-
2 tbsp extra-virgin olive oil
-
1 tbsp Dijon mustard
-
3–4 cloves garlic, minced
-
1 tsp dried oregano
-
½ tsp sumac (for a slight lemony note — optional)
-
½ tsp kosher salt (adjust to taste)
-
¼ tsp black pepper
-
1 red bell pepper, cut into bite-sized pieces
-
1 yellow bell pepper, cut into bite-sized pieces
-
3–4 large shallots, peeled and halved
-
Optional: cherry tomatoes, mushrooms, or zucchini for extra veggies
Instructions
-
Marinate the Steak:
In a large bowl, whisk together olive oil, Dijon mustard, garlic, oregano, sumac, salt, and pepper. Add the cubed ribeye and toss until well-coated.
Tip: Let marinate 30 minutes to 2 hours in the fridge for the best flavor. -
Prep Oven:
Preheat oven to 425°F (220°C). Line a large baking sheet with foil. -
Thread Kabobs:
Alternate pieces of ribeye, bell peppers, and shallots on metal skewers (wooden will work if soaked first). -
Bake:
Spread skewers on the sheet (don’t crowd). Bake 12–15 minutes for medium-rare to medium (cook longer if you prefer your steak more done), flipping halfway. Steak cooks faster than chicken — aim for 125–130°F (52–54°C) internal for medium-rare, or 135°F (57°C) for medium. -
Optional Broil:
To get a slight char like on the grill, switch the oven to broil high and broil 1–2 minutes, watching closely so nothing burns. -
Rest & Serve:
Let the kabobs rest 5 minutes before serving with the rice.
Persian-Style Tomato Rice (Dami Gojeh-Farangi Inspired)
This aromatic rice pairs beautifully with steak and brings a subtle tang from tomatoes.
Ingredients
-
2 cups basmati rice
-
3 tbsp butter or oil
-
1 medium onion, finely chopped
-
3–4 cloves garlic, minced
-
2 cups fresh tomatoes, finely diced (or 1 can diced tomatoes, drained)
-
1 tsp turmeric
-
½ tsp ground cumin
-
Salt + black pepper, to taste
-
Optional garnish: chopped parsley or dill
-
(Optional) A touch of tomato paste or a squeeze of lemon for brightness
Instructions
-
Rinse the Rice:
Rinse basmati under cold water until the water runs clear. Soak for 20–30 minutes, then drain. -
Cook Aromatics:
Heat butter/oil in a large pot over medium heat. Add onion and cook until soft, ~5 minutes. Add garlic and cook 1 minute. -
Tomatoes & Spices:
Stir in tomatoes, turmeric, cumin, salt, and pepper. Cook 5–7 minutes until tomatoes soften and meld with spices. If tomatoes are very juicy, cook a bit longer to reduce excess liquid. -
Add Rice & Water:
Add drained rice and gently toss to coat in the tomato mixture. Add about 3 cups of water (just enough to cook rice; ratio can vary a bit by rice brand). Stir gently. -
Simmer & Steam:
Bring to a boil. Then reduce the heat to low, cover tightly, and simmer 15–18 minutes until the water is absorbed. -
Fluff & Serve:
Turn off the heat and let rest covered 5 minutes. Fluff with a fork, garnish with herbs, and serve alongside your steak kabobs.
Serving Suggestions
-
A cool yogurt-cucumber sauce or tzatziki complements the steak and rice nicely.
-
Add a crisp green salad with lemon-olive oil dressing to balance the richness.
Happy cooking and stay quirky!
Contact
I'm always looking for new and exciting opportunities. Let's connect.
Lets connect on Social Media!